Install Kali Live USB or (Live USB Persistence, Optional)
Hi guys, in my previous and first post about ethicalhacking, I started a small chat about Ethical Hacking. Before you start EthicalHacking Tutorials, you need dragon in your computer that is Kali Linux. I am assuming everyone know what is Kali Linux? And it’s importance in hacking. There are many methods to run Kali Linux in your computer, I will explain as many as possible but I personally I prefer using a live boot USB/pend drive, without making any change in your computer. Following are the reason for using a live USB/pen drive.
You use maximum all your system resources such as CPU, RAM, GPU, etc.
No space of hard drive used less chance to crash your system.
Portable: You can take your Kali to everywhere.
Remember in this method you can either make a simple live USB or live USB with Persistence which is optional. The difference is only of saving changes, in persistence all change in Kali as well as your data would save, in other hand in simple live USB, changes never take place. Choose according to your requirements.
Requirements:
- A pen drive of at least 4GB
- Kali Linuximage
- UniversalUSB installer
Make Live USB of Kali
First download a Kali image. Download 32/64 bit ISO according to your system. If you not sure about your system download 32 bit, it work for both system type.
Run Universal USB Installer, select image of Kali where you have downloaded it, and then choose the drive of you USB drive/pen drive.
That'll wipe/format your whole pend drive data, so make sure back up everything you had there before proceeding.
Now click on Create, then Yes, and it'll do the whole process by itself.
If everything went as expected, you'll see this, and you have a live USB.
You live pen drive is ready to use. Now reboot your computer, press F12 (in my case) and boot up from your USB drive. Choose the option "Live USB". In few minutes Kali will be booted up.
Either you can run this directly or you can set up it as persistence.
Note>> When you run it as live your data will not save for further while in persistence you all data will save in pen drive. Your USB drive must have 8 GB+ of storage space.
Making live Persistence Kali Linux
Preparing the Partition
1. Download MiniTool Partition Wizard Free, install it, run it.
2. Choose Launch Application. Then right click on your USB drive, and click on Move/Resize.
3. Use the small black arrow keys to shrink the partition size. It will leave a bit of storage space free.
4. A new big grey chunk of un-allocated space as appeared! Right click on it and click on Create.
Pick these options:
a. Create as: Primary
b. File System: Ext4
c. Partition Label: persistence
5. Then click OK. Now click on Apply (upper left corner), and just wait for it to complete the tasks.
Configuring the Partition
Once the partition manager finished, reboot your computer and boot up from your USB drive. Choose the option "Live USB Persistence", and when it's booted up,
1. Open a Terminal and type these commands:
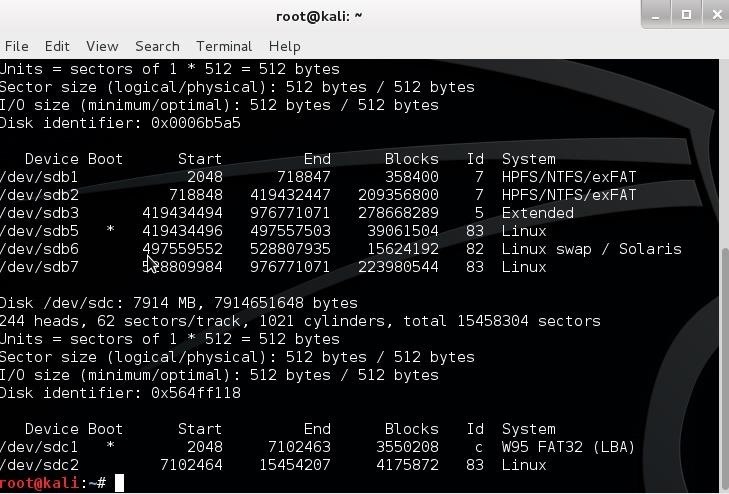
fdisk -l
This command determines which partition of your drive you'll use.
Remember your drive had a FAT32 partition and a Ext4 (Linux) one.
2. Make a directory on the file system to mount your USB by typing command:
mkdir -p /mnt/my_usb
3. Mount the partition on the directory you made by typing:
mount /dev/sdc2 /mnt/my_usb
4. Add a configuration file to enable persistence by typing
echo "/ union" > /mnt/my_usb/persistence.conf
5. Unmount the partition and reboot
umount /dev/sdc2 && reboot
That’s all done, now you all data will saved in you pen drive. Any changes and configuration makes in OS will remain same in next boot up.
Now you have your own Kali Linux. Let’s hacking begins…
How to make Kali Live USB/pen drive? | Ethical Hacking part-2
 Reviewed by Unknown
on
November 07, 2016
Rating:
 Reviewed by Unknown
on
November 07, 2016
Rating:


No comments: